Why Pending Orders?
In the cryptocurrency market, trading opportunities are often fleeting, especially arbitrage opportunities, which may only last for a few minutes. If you rely on manual operations, users may not be able to seize the best opportunity in time or miss the best price. For example, due to the hacker attack on Bybit some time ago, USDe was decoupled, causing its price to fluctuate greatly. At that time, the annualized rate of return exceeded 300% by buying sUSDe and redeeming it. This high-yield window usually lasts for a very short time. If the pending order is not set in advance, it is difficult for manual trading to keep up with the market rhythm. Therefore, the pending order function has become an important tool for decentralized exchange (DEX) users, improving trading efficiency significantly.
The Principles and Shortcomings of DEX Pending Orders
Multiple DEXs offer limit order functionality, each with different implementations and fee structures. Take Cow Swap and Odos as examples. The core principle is to use its aggregator function to monitor the liquidity and prices of multiple DEXs in real time. When the market price meets the limit conditions, the order will be triggered by the taker, and the smart contract will execute the transaction automatically and pay the gas fee. Cow will also store the user’s order off-chain, and a group of decentralized nodes called “Solvers” will compete for matching, but ultimately execute on-chain. In short, although GAS is exempted, the extra profit generated by the transactions completed by these DEXs for you can cover the GAS fee.
But this brings up a problem: if one of your orders is pending at a price of 90U and the aggregator monitors that the price of a certain DEX has dropped to 80U, it will execute the transaction for you. Your order is finally traded at a price of 90U, and a profit of 10U is generated in the middle. How to distribute this profit? In actual operation, different platforms have different processing methods. Taking Cow Swap as an example, its mechanism stipulates clearly that when the execution price is better than the limit price, the surplus (that is, the 10U) generated will be divided between the platform and the user, Cow Swap will extract 50%, and the user will get the remaining 50%. Odos will deposit all the surplus into the vault. In essence, your order is risk-free arbitrage by the DEX exchange.
In addition, in order to save transaction fees, DEX pending orders are aggregated tradings, that is, many transactions are packaged together every once in a while, and ETH has a block of 12s, which will lead to missing some possible opportunities. Of course, DEX still has many advantages, such as searching more paths, offline matching, saving GAS, etc., which are enough for most users.
Advantages of Placing Orders with Your Own Program
Compared with relying on the aggregated orders of DEX, direct trading through smart contracts has unique advantages. First, users can fully control the order execution logic and all surpluses. Secondly, placing orders by yourself avoids the packaging delay of aggregated transactions and can respond to market changes more quickly, especially seizing opportunities within 12 seconds during high volatility. In addition, custom orders can set complex conditions flexibly (such as multi-asset portfolio transactions or take-profit and stop-loss) without being restricted by the preset functions of the platform. However, this requires certain programming skills, and you need to pay the gas fee yourself, and there may be security risks on the chain. Therefore, placing orders by yourself is suitable for advanced users with strong technical capabilities and pursuing maximum benefits.
Protection of Private Keys
If you want to operate smart contracts with your own programs, the security of your private key is undoubtedly your biggest concern. The solution I have come up with is to encrypt your own private key offline with Python, and store the encrypted ciphertext on the server running the docker. The decrypted password is passed in with the parameters of the FMZ platform robot, and the program runs on the docker and reads and decrypts it (it can be deleted after the program runs). In this way, even if your server is hacked, there is no problem, but you still need to pay attention to not leaking the FMZ account. Since it only involves plain text after being offline, the security is acceptable.
The specific code is as follows, which can be run locally when offline.
from web3 import Web3  # Web3.py is a Python library for interacting with the Ethereum blockchainimport json  # For processing JSON dataimport time  # To set the time intervalimport requests  # Used to send HTTP requestsfrom cryptography.fernet import Fernet
import base64
import hashlib
from datetime import datetime
from hexbytes import HexBytes

defgenerate_key(password: str) -> bytes:
    """Generate AES key from user password"""return base64.urlsafe_b64encode(hashlib.sha256(password.encode()).digest())

defencrypt_private_key(private_key: str, password: str) -> str:
    """Encrypt the private key with a password"""
    key = generate_key(password)
    cipher = Fernet(key)
    return cipher.encrypt(private_key.encode()).decode()

defdecrypt_private_key(encrypted_key: str, password: str) -> str:
    """Decrypt the private key using the password"""
    key = generate_key(password)
    cipher = Fernet(key)
    return cipher.decrypt(encrypted_key.encode()).decode()

defsave_key_to_file(key, file_path):
    # Save the encryption key to a txt filewithopen(file_path, 'w') as file:
        file.write(key)

defload_key_from_file(file_path):
    # Read encryption key from txt filewithopen(file_path, 'r') as file:
        returnstr(file.read())

defmain():
    encrypt_key = encrypt_private_key('my_private_key', 'password') # my_private_key is your own private key, and password is the password you set
    save_key_to_file(encrypt_key,'encrypt_key.txt')
    print("Encrypted private key", encrypt_key)
    decrypt_key = decrypt_private_key(load_key_from_file('encrypt_key.txt'), 'password')
        print("Decrypted private key", decrypt_key)
Preparation Before Linking ETH
Web3.py is a powerful Python library for interacting with the Ethereum network. Install it with the following command: pip install web3. Its role is to simplify the communication between developers and Ethereum nodes, supporting operations such as querying balances, calling smart contracts, and sending transactions. For example, checking account balances only requires a few lines of code, which makes Web3.py an ideal tool for building DApps or automating transactions.
python
from web3 import Web3
w3 = Web3(Web3.HTTPProvider('Your RPC address'))
balance = w3.eth.get_balance('0xSome address')
print(w3.from_wei(balance, 'ether'))
RPC (Remote Procedure Call) is a communication interface provided by the Ethereum node, which sends JSON requests to interact with the blockchain through HTTP or WebSocket protocol. For example, eth_blockNumber can query the latest block height. Due to the high cost of running a local node, developers usually rely on third-party RPC providers. Common choices include:
- Infura: MetaMask default service, easy to use but with low free quota (100,000 requests per day).
- Alchemy: Superior performance, high free quota, and support for more features.
- QuickNode: Suitable for high performance needs, but biased towards paid users.
from web3 import Web3
w3 = Web3(Web3.HTTPProvider('https://eth-mainnet.g.alchemy.com/v2/Your API Key'))
print(w3.is_connected())
It is recommended to use Alchemy. Compared with MetaMask’s Infura, Alchemy provides a higher free quota. After registration, you can get the RPC address, such as https://eth-mainnet.g.alchemy.com/v2/your API key, and configure it to Web3.py for use.
Curve Contract Address and ABI
Taking the Crve pool of sDAI/sUSDe as an example: https://curve.fi/dex/ethereum/pools/factory-stable-ng-102/swap/, you can easily find the addresses of the two tokens and the address of the pool.
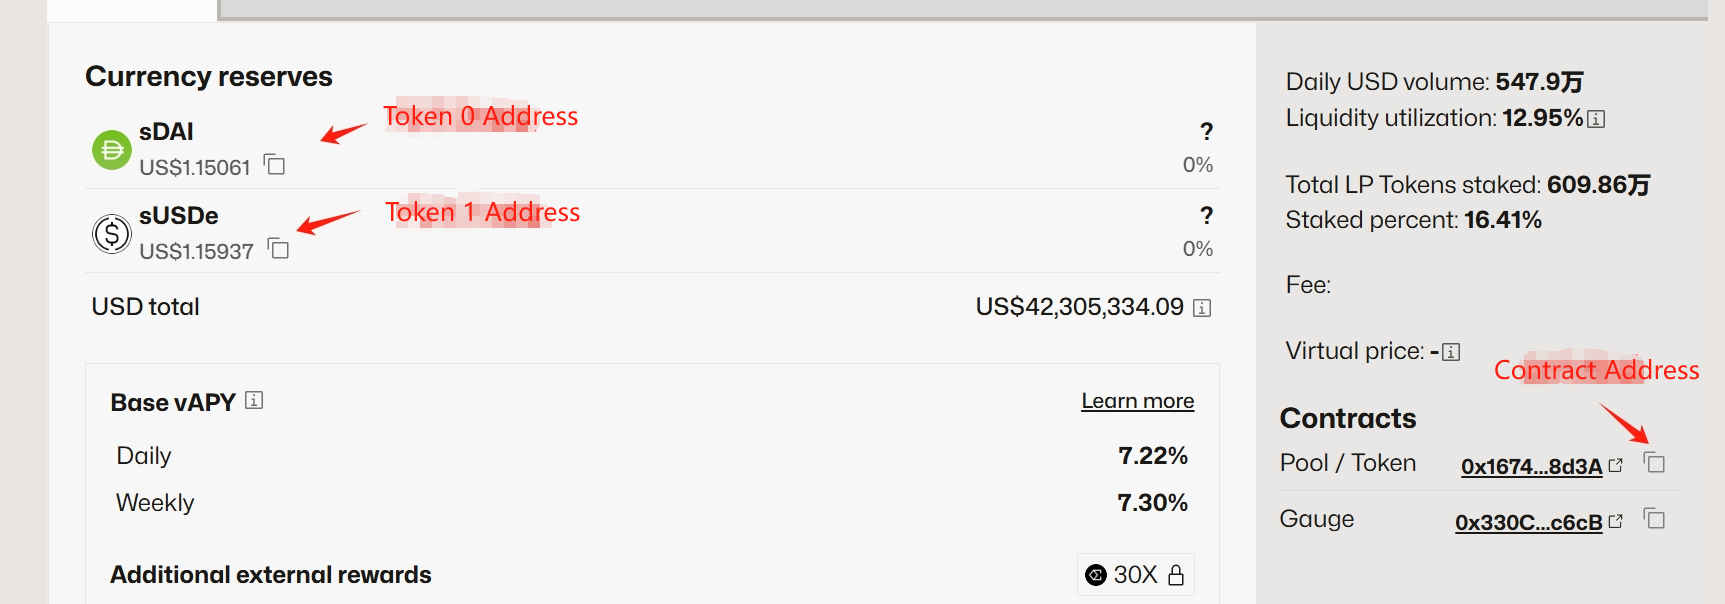
ABI defines how to interact with the contract, so it is also necessary to obtain it. View the contract on ethscan https://etherscan.io/address/0x167478921b907422f8e88b43c4af2b8bea278d3a#code. You can see the abi on the contract page and copy it directly.
Link Contract to Get Price
First, link the ETH wallet. If your wallet address is printed out, it means it is successful.
defmain():
    # File path
    file_path = 'encrypted_key.txt'# Read the encrypted private key from the file
    encrypted_private_key = load_key_from_file(file_path)
    private_key = decrypt_private_key(encrypted_private_key, Password) #Password is the password, defined as a parameter of the strategy
    web3 = Web3(Web3.HTTPProvider(HTTPProvider)) # HTTPProvider is the link for RPC, defined as a parameter
    account = web3.eth.account.from_key(private_key)
    address = account.address  # Get the public address of the account
    Log('Linking account', address)
The following is the process of obtaining the price. Finally, without considering the GAS fee, the current investment of 100,000 SDAI will yield a profit of 335U in one week. It may seem a bit complicated, but it is not difficult to understand.
# --------------- Contract settings ---------------# Curve.fi sDAI/sUSDe pool contract address and ABI
    pool_address = '0x167478921b907422F8E88B43C4Af2B8BEa278d3A'# Curve pool contract address# The following is a simplified ABI that contains only the functions we need.
    pool_abi = json.loads('''[{"stateMutability":"view","type":"function","name":"get_dy","inputs":[{"name":"i","type":"int128"},{"name":"j","type":"int128"},{"name":"dx","type":"uint256"}],"outputs":[{"name":"","type":"uint256"}]}]''')
    # Create a pool contract object
    pool_contract = web3.eth.contract(address=pool_address, abi=pool_abi)

    # ERC20 Token standard contract ABI
    erc20_abi = json.loads('''[
        {"constant":true,"inputs":[{"name":"_owner","type":"address"}],"name":"balanceOf","outputs":[{"name":"balance","type":"uint256"}],"type":"function"},
        {"constant":false,"inputs":[{"name":"_spender","type":"address"},{"name":"_value","type":"uint256"}],"name":"approve","outputs":[{"name":"success","type":"bool"}],"type":"function"},
        {"inputs":[],"name":"decimals","outputs":[{"internalType":"uint8","name":"","type":"uint8"}],"stateMutability":"view","type":"function"}
    ]''')

    sdai_address = '0x83F20F44975D03b1b09e64809B757c47f942BEeA'# sDAI token contract address
    susde_address = '0x9D39A5DE30e57443BfF2A8307A4256c8797A3497'# sUSDE token contract address# Index of tokens in the pool
    SDAI_INDEX = 0# Index of sDAI tokens in the pool
    SUSDE_INDEX = 1# Index of sUSDE tokens in the pool# Create a token contract object
    sdai_contract = web3.eth.contract(address=sdai_address, abi=erc20_abi)
    susde_contract = web3.eth.contract(address=susde_address, abi=erc20_abi)
    SUSDE_PRICE = 1.1623#This price is the price on the ethena official website and can be redeemed after 1 week
    SDAI_PRICE = 1.15#sDAI is a revenue token, its value will accumulate, and its current price is 1.15try:
        SDAI_DECIMALS = sdai_contract.functions.decimals().call()
        SUSDE_DECIMALS = susde_contract.functions.decimals().call()
    except:
        # If this is not available, the standard 18-bit precision is assumed.
        SDAI_DECIMALS = 18
        SUSDE_DECIMALS = 18
    amount_in = 100000
    amount_out = pool_contract.functions.get_dy(
                    SDAI_INDEX,  # Input Token index
                    SUSDE_INDEX,  # Output Token indexint(amount_in *  10**SDAI_DECIMALS)   # Input quantity (wei)
                ).call()
    profit =  SUSDE_PRICE * amount_out / 10**SUSDE_DECIMALS -  amount_in * SDAI_PRICE
    Log(round(profit, 2), round(amount_out / 10**SUSDE_DECIMALS, 2))
Full Program
Finally, use polling to obtain prices continuously, and place an order when the expected profit is reached. Note that this code is only a sample code, do not use it directly. Readers may encounter various problems in practice, but AI is very powerful currently and can answer various questions. It can also help write code directly. FMZ’s code editor also integrates ChatGPT, which can be used more.
defexecute_trade(amount_in, min_amount_out, direction):
    gas_price = web3.eth.gas_price
    index_in = SUSDE_INDEX
    index_out = SDAI_INDEX
    if direction == 'buy':
        index_in = SDAI_INDEX
        index_out = SUSDE_INDEX
    # Step 2: Execute the Token swap transaction
    swap_tx = pool_contract.functions.exchange(
        index_in,  # Input Token index
        index_out,  # Output Token indexint(amount_in*10**SDAI_DECIMALS),  # Input quantityint(min_amount_out*10**SUSDE_DECIMALS)  # Minimum output quantity (considering slippage)
    ).build_transaction({
        'from': address,  # Transaction sender'gas': 600000,  # gas limit'gasPrice': int(2*gas_price) ,
        'nonce': web3.eth.get_transaction_count(address),  # Get a new nonce value
    })

    # Sign and send the exchange transaction
    signed_swap_tx = web3.eth.account.sign_transaction(swap_tx, private_key)
    swap_tx_hash = web3.eth.send_raw_transaction(signed_swap_tx.rawTransaction)

    Log(f"The exchange transaction has been submitted, transaction hash: {swap_tx_hash.hex()}")

defget_buy_profit(amount_in):
    amount_out = pool_contract.functions.get_dy(
                    SDAI_INDEX,  # Input Token index
                    SUSDE_INDEX,  # Output Token indexint(amount_in *  10**SDAI_DECIMALS)   # Input quantity (wei)
                ).call()
    return  SUSDE_PRICE * amount_out / 10**SUSDE_DECIMALS -  amount_in * SDAI_PRICE, amount_out / 10**SUSDE_DECIMALS

defmain():
    whileTrue:
        try:
            sdai_balance = sdai_contract.functions.balanceOf(address).call() / 10**SDAI_DECIMALS
            susde_balance = susde_contract.functions.balanceOf(address).call() / 10**SUSDE_DECIMALS
            amount_in = 100000#Amount of DAI traded
            profit, amount_out = get_buy_profit(amount_in)
            LogStatus(f"SDAI quantity: {sdai_balance}, SUSDE quantity: {susde_balance}, profit: {profit}")
            if profit > 1000and sdai_balance > amount_in: #Profit margin
                Log("\nStart executing SDAI->SUSDE transaction...")
                execute_trade(amount_in, 0.999*amount_out, 'buy') #Slippage must be set
            wait_time = 3# Waiting time (seconds)
            time.sleep(wait_time)

        except Exception as e:
            # Global error handlingprint(f"Program error: {e}")
            print("Retry after 60 seconds...")
            time.sleep(60)  # Wait longer after an error
Risk Reminder
On-chain operations are relatively risky for novices. In addition to the risk of private key leakage mentioned above, there are various other risks:
- MEV robots must set the minimum output min_amount_out when executing transactions to ensure that there is profit even in the worst case, otherwise they will be exploited by MEV. Today, a person used 220,000 USDC to exchange for only 5272 USDT on Uniswap, because amountOutMinimum was set to 0.
- Strategy errors, just like the exchange API, if there is a bug in the on-chain program transaction, GAS will be consumed frequently.
For those new to on-chain trading, you need to learn the basics: understand concepts such as Gas, slippage, MEV, etc. Always start with a low amount and gradually increase it. Use Etherscan to monitor transactions. It is better to miss an opportunity than to risk losing your capital.
From: How to Implement Pending Orders in Decentralized Exchanges — Taking Curve as An Example